Actually, I think this video speaks for itself.
When I show this video on the big screen in my otherwise dark classroom, even hyperactive seventh graders gradually stop talking and sit, watching peacefully.
The same thing happened when I showed it to a classroom full of frazzled teachers at a district-wide conference, yesterday.
Watch it as large as possible, at high resolution. You will actually feel your blood pressure drop.
For the second year now, I have had the students in my World War One/Two elective make " Common Craft"-style videos explaining different aspects of the First World War. Without further ado, here they are:
Lessons Learned:- Have students help brainstorm video topics - I put a few possible topics on the board - "The Treaty of Versailles in Plain English", "Life in the Trenches in Plain English", "Spanish Influenza in Plain English" - and had students take it from there. My guys came up with some really good topics. Each team got to pick their own topic. All three videos this year turned out to be topics that the students had come up with themselves.
- Pick teams (semi) carefully - Eric Langhorst, the teacher from Missouri who I stole this idea from (indeed, who I steal most of my good ideas from) suggests using teams of five students. Teams of three-four seems to work best for me. Last year, I decided who would be on each team and made a mild-mannered or slacker-y student the team leader. That worked pretty well. This year, I still picked the team leaders and let them pick the members of their team, one at a time, like for a pick-up kickball game. The idea was to give them a little more control and choice in their project (something I always try to do) and it seemed to work well, but as someone who was ALWAYS picked last for everything as a kid, it left a bad taste in my mouth. While I've learned over the years to try and ignore my notoriously unreliable gut-feelings, I think I'll go back to choosing the teams myself next time, perhaps with student input.
- Use a tripod - I mounted my Flip video camera on a standard tripod. I put the tripod on top of a large table and tilted the head forward to not-quite ninety degrees. I taped down a large sheet of poster paper at the end of the table and used the zoom function on the camera to narrow the shot to the center of the paper. This let the students on each team spread themselves around three sides of the workspace.
- Have students do a dry run first - Even teams who have been responsible and practiced their presentation tend to mess up in front of the camera (well, under the camera in this case). I let each team do a dry run before we actually filmed their project. That seems to have worked out well. At the request of the students, I sent other teams out into the hallway to ease the nerves of the team who was shooting.
- Editing is Okay - My policy last year was to film each project in one take and put it online with no editing. The idea was to make students more attentive to details. This year, one of my students has a speech impediment and I ended up adding sub-titles. Under the philosophy of "In for a penny, in for a pound", I added a few more sub-titles in all three videos and trimmed a few seconds of "dead air" from the beginning and end of the movies. Also, an announcement came over the intercom as one team was just finishing, so I edited that out, as well. I tried to use a light hand with the editing, though.
All in all, I'm pleased with how this project went this year and I will definitely do more of these movies. Your comments are, as always, welcome.
When I first started teaching, I was hampered by my pride in my own creativity. I felt like everything I came up with for my students should be new and original and sparkling with impressiveness.
Now, ten years later, I enthusiastically rip off any good idea that isn't nailed down.
Some of the best ideas I've heard recently come from my counterpart in Liberty, Missouri, a teacher named Eric Langhorst. Last year, he was Missouri's Teacher of the Year and conveniently, he also teaches 8th Grade American History. I first ran across him via his podcast and his brilliant Break-Up Note lesson.
A couple of weeks ago, Eric podcasted and blogged about a project he had done with his students. They had produced short, CommonCraft-style videos about topics they had studied in class. (You may have seen CommonCraft's videos before - they take complicated topics and break them down into "Plain English". They are ultra-low-tech, nerdy, funny videos that really engage viewers.)
I've been a big fan of CommonCraft videos, but I'd never thought about using them in the classroom. My World War One/World War Two elective class had just finished studying WW1 and I had been looking for a good mid-course project for them. These CommonCraft videos seemed like a really good idea.
There are six boys in my class (I'd really like to try it with all girls someday - it would TOTALLY change the dynamic of the course.), so I split them up into teams of three and gave them several topics to choose from. We spent a class period watching "In Plain English" videos - both from CommonCraft and from the students in Missouri. I gave them another period to do research online and another period or two to put their material together. We only meet twice a week, so in total, they spent about two weeks working on this.
We filmed the videos on a table in my classroom using a Flip video camera, suspended by a goose-neck microphone stand. (This made the video footage a little bouncy at first, but now that we know about it, we can prevent that in the future.) The camera has a glossy finish and tended to shoot out from the microphone holder, until we put a piece of masking tape on the camera to rough it up a little. I'm going to look for a clamp attachment that I can screw into the microphone stand to hold the camera more securely next time.
Anyway, here are their movies, How World War One Started, In Plain English and Six Ways To Die In World War One In Plain English:
We've already gotten a positive comment on this video on Vimeo, the video hosting service we used to post it. The commenter turned out to be Lee Lefever, the creator of the CommonCraft videos, and a really gracious guy. My students will be SO stoked about that!
Let us know what you think.
Okay, admittedly it took quite a while to put the different pieces of this project together, but my 8th Grade Social Studies classes have just finished with an unbelievably, mind-numbingly, chew-on-the-carpet, kick-butt project. (Umm... in other words, the kids did a really good job on this.)
If you'll indulge me, let me tell you a story:
Our Immigration Unit is designed to make students think critically about an important, emotionally-charged issue and decide what THEY think based on facts, rather than what their parents or friends or teachers think. Our Essential Question for the unit is, "Who Deserves to Be an American?" (This is phrased deliberately provacatively.)
As part of this unit, the students look at a series of somewhere between 40-50 political cartoons from the early 1800s to present dealing with immigration. The kids are really good at picking out details in a these pictures and speculating about what they mean. By the time we have spent three or four class periods interpreting political cartoons, they usually have a really good grasp on political symbolism.
The next stage of the unit is looking at two poems written at roughly the same period in American history - Emma Lazarus' "The New Colossus" (the "Statue of Liberty Poem"), which was very supportive of the idea of new immigrants, and "The Unguarded Gate" by Thomas Bailey Aldrich, which took a much dimmer view of immigrants and the danger he thought they posed to American culture.
Now, this can get pretty hairy. Victorian poetry is awfully dense stuff at the best of times and Aldrich's poem is pretty ornate, even by the standards of the time. In past years, I've asked the students to translate these poems into modern American English. This was a mixed success at best. Really good students who liked working out puzzles did pretty well, but most of them just sort of closed their eyes and "punted" and really didn't learn much from the experience. This year, I decided to try another approach:
I had each student pull a colored poker chip from a jar (the Awesome Jar of Destiny - Da Da DAAAAAHHHHH!!) [Don't worry if you don't get the reference.]. Students with one color were assigned to draw a political cartoon expressing the point of view from Emma Lazarus’ poem. Students who pulled the other color were assigned to draw a cartoon from Aldrich’s point of view.
The cartoons I got back were stunning.
No. Seriously. They were really, really good. Professionally good, in some cases. So good, in fact, that I felt that they really needed to be brought to a wider audience. Here's what I did:
I scanned each cartoon, creating a digital image (a jpeg file) and put each class' work into a separate folder.
In class, using our classroom projector, we opened up PowerPoint and used the Photo Album function to drop all the student artwork into a presentation. It automatically created a title page slide, which we changed to suit the class' tastes. We also quickly highlighted all the slides with cartoons and formatted them to have a neutral color in the background.
Using a TuneTalk recording device and an iPod, student volunteers recorded descriptions for each of the following slides –
1. An explanation of “The New Colossus”,
2. A reading of the actual poem,
3. An explanation of Thomas Bailey Aldrich’s point of view,
4. A reading of his poem,
5. An explanation of the cartoon project.
Next, we edited each clip in Audacity, taking out all the pauses and mistakes. (Once each clip was edited and saved, the students loved hearing what it sounded like at a much higher or much lower pitch - the "chipmunk" or "kidnapper" versions.)
As a class, we searched for images to go with each commentary online and built slides with the images and the .wav files. The student whose voice was used on a given slide was given a lot of creative control over what the slide would look like and how it would run. Text could remain static for instance, or appear gradually, using the Wipe function. If he or she wanted it to appear gradually, the class needed to look at how many seconds the sound file took to play, then set the Wipe to run in that many seconds.
Each class picked a piece of music to play in the background, while the slides of their cartoons runs. They needed to calculate the number of seconds that the song was, then divided that by the number of slides that would run during the song. Then, as a class, they selected all those slides and set the animation to advance each of those slides automatically at that interval. (Less complicated than it sounds.)
Later on, I (maybe next year, it can be a student) played the PowerPoint and recorded it with AutoScreenRecorder, then used Microsoft MovieMaker to convert it to a movie file. The sound does not record with AutoScreenRecorder, so I ended up dragging and dropping the individual sound files that the kids had recorded into Movie Maker. Because I had recorded the PowerPoint in real time, they matched up more or less perfectly. I ended up with a video file that I was able to upload to our school server and to TeacherTube.
I'm really proud of th.
Geek Alert! - Warning: This post is pretty tech-geeky (unless you actually know something about computers, in which case, you'll wonder why I'm making such a big deal out of something so simple...) I teach a Computer Applications class to 7th and 8th graders as an IA. It is a half-year class. For the first marking period of the class, the students do a lot of exploration and learn a bit about doing internet searches, editing photos and sounds, using PowerPoint, word-processing and other basic computer applications. For the second half of the course, I have each student choose a topic, then build a project that includes aspects of everything he or she has learned over the course so far. This generally means a PowerPoint that showcases other types of work.  One of my 8th graders is fascinated by a one-celled organism called euglena. This particular student is extremely tech-savvy and enthusiastic. (He knows much more than I do about many computer applications.) While searching online, he found a website with a short movie featuring these one-celled organisms. He really wanted to include this movie in his PowerPoint. (I don't have a problem with that, as long as he cites his source - he's not going to try to make money with this or anything.)
Unfortunately, this was easier said than done:
 The website simply has a window that shows the movie. When you go there, a box appears in the middle of the screen and a moment later, there is a short movie running there. There aren't any options for downloading the video.
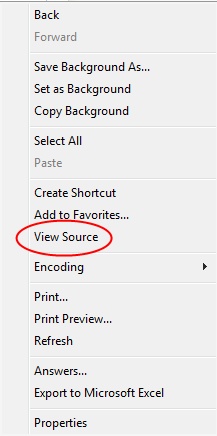
I addressed this in a typically over-elaborate and complicated way. There is a command called "View Source" that allows you to read the computer code that a webpage is written in. (See the picture on the right.) By reading the code, this student and I found out the actual filename of the video, then used Zamzar to convert and download it. (See previous post for information on Zamzar.)
It was only later, that I realized there was a simpler way of doing this.
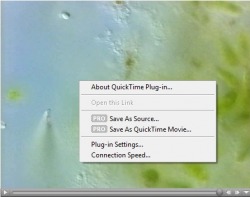 I could have just right-clicked.
On the any pc-type computer mouse, there are usually two buttons. the "left-click" button that you almost always use with your index finger and the mysterious, almost threatening button on the right that most computer users never use and try to avoid because it confuses them.
The right click is your secret best friend.
Clicking anything with that right-hand button will open up a window of options in any given situation that you never dreamed about.
Including, in this case, the option to just download the darn video without having to search through all that code.
(As it turns out, though, this particular movie is a Quicktime movie - meaning that it is Apple-based. PowerPoint is PC-based and the two don't get along. I would have still needed to use Zamzar to convert the Quicktime movie (.mov) to a format more suitable for PowerPoint (.mpg). Did I just make your eyes glaze over? I'm really, really sorry. I'll try not to do that again.)
Once I had actually downloaded the euglena video though, there was a second problem - it was an insanely large file. Yes, the video was "short" compared to Citizen Kane or something, but it was over nine minutes long and really, really huge - 26 megabites: way too big to fit easily into a PowerPoint presentation.
There had to be another way of finding euglena video footage that was a little more user friendly. 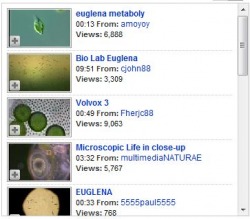 As it turns out, there was. Is. Er... whatever...
On a whim, I looked up the word "Euglena" on YouTube. "What are the odds," I asked myself, "that anyone would be geeky enough to actually post footage of a single-celled animal-like alga on YouTube?"*
As it turns out, quite a few. My student and I are somewhat spoiled for choice vis-avis euglenic video footage.
So I guess the main lesson to be learned from all this is, K.I.S.S. - "Keep It Simple, Student". Or Teacher. Er...whatever...
* When I asked my wife this question, she pointed out, "You would."
Sadly, she's right.
 If there is any website that strikes terror into the hearts of people in education, it is YouTube. It is ALWAYS blocked from any school network. The idea of students having access to raw video footage uploaded from who-knows-where is pretty scary. On top of that, even a quick look at the content on YouTube doesn't inspire much confidence in humans as a species - there are some pretty dumb people out there with access to a video camera and the dumber they are, the more likely they are to have stuff posted on YouTube.
There is an old axiom called "Sturgeon's Law" that says, "90% of everything is crap". So what about the other ten percent?
If you know what to look for (and even if you don't), there is an astounding amount of really useful (and cool) footage on YouTube that works really, REALLY well in the classroom - footage from classical music concerts, political campaign ads, great speeches from history, important events as they appeared on the news - you name it.
The problem though, as stated above, is, YouTube is always, ALWAYS blocked from any school network. So how can you use it in your classroom?
 The answer is Zamzar.com. This is one of several online services that allows you to convert just about any type of computer file to any other type of computer file. You tell it what you want to convert and when it's done converting it, it will send you an email with a link to download the newly converted file.
(If that sounds scary and techno-jibberishy, think about it this way: If you didn't like the color of your car, you could send it to a body shop to be repainted. When they had finished redoing your car, they'd give you a phonecall to let you know it was done and where you could pick it back up. This is sort of like that.)
The other really cool thing that Zamzar does is to convert online videos like those on YouTube into video files that you can store on your computer. If you find a video clip that you want to use on YouTube, you can use Zamzar to download it for use in your classroom later.
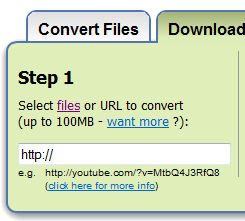 Just copy and paste the URL (web address) of a particular YouTube video into the URL box in Zamzar, fill in the rest of the information it asks you for, then select "Convert". A taskbar at the bottom of the window will let you know when the file has been converted. A couple of minutes later, if you check your email, you will find a link that will allow you to download the video to your computer. If you are planning to use the video as part of a PowerPoint presentation, you should probably convert it to an "mpeg" file. If you are an Apple user, choose a "mov" file.
There is another advantage to doing this:
A couple of years ago, there was a particular video I needed to use in a class. It was a time-lapse video of traffic on the Panama Canal. At the time, the only way I knew of to access it was on streaming video. I had to swear all my students to secrecy everytime I showed it, because it took so much of the school's bandwidth, each time we watched it, everyone else's internet access in the school crashed to a halt. By downloading a video to my own computer, I avoid that whole headache.
Secret, Emergency Trick to Get Around School Filters:
If you are at school and suddenly realize that you need to use a YouTube video, but are frustrated by the internet filter, there IS a way around it - sort of. Let's imagine that you need a video of Dr. King's "I Have a Dream" speech:
Open a search engine like Google. Type in a search string that says something like:
YouTube, I Have a Dream
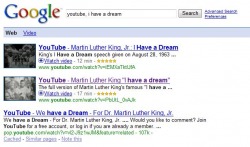 You will get something that looks like this. Choose the video clip that you want to use. (You'll have to take your best guess on which one that would be.)
If you do this at school, it will take you to the dreaded "This Website Is Blocked" Page of Doom. But it will also tell you exactly which webpage it is blocking. If you copy that web address, then plug it into Zamzar, you can send the link for the converted file to your school email account, then use that to download the video.
This is not a perfect solution, but I used it a few months ago to get a Barrak O'Bama campaign video that I needed on short notice.
Try downloading a video from YouTube this week. Your classroom might become 2-3% cooler.
YouTube: It's not just for idiots anymore.
[Note - It has been brought to my attention that this may violate YouTube's Terms of Use Agreement. While I doubt that specially trained YouTube ninjas will be sent to punish you for this, you should read the Agreement and make your own decision.]
|

 RSS Feed