Movie on 12-17-13 at 8.58 AM from John Fladd on Vimeo.
Rome Interview 2013 from John Fladd on Vimeo. For the second year running, our 7th graders prepared questions for Classical Archaeologist Leigh Leiberman about Ancient Rome. This year, she was kind enough to talk to us from Italy.
As part of my Sears Catalog/Victorian Christmas Shopping Unit, I was able to interview another expert about corsets - this time, Marcy Engleman, a medical historian with the Philadelphia College of Physicians and the Mutter Museum in Philadelphia.
Corsets 1 from John Fladd on Vimeo. An interview with Leslie Bellais, a fashion historian with the Wisconsin Historical Society about the history of corsets in America.
Ten of my 8th grade girls asked her some very good questions and were really into this. Which, of course, makes me happy in turn. The Mind-Blowingly Awesomest Classroom Activity That I'll Probably Never Be Allowed do Do Again3/6/2013 1) I love this video: 2) I teach 7th graders Medieval History. 3) So I did this:  4) And then this: 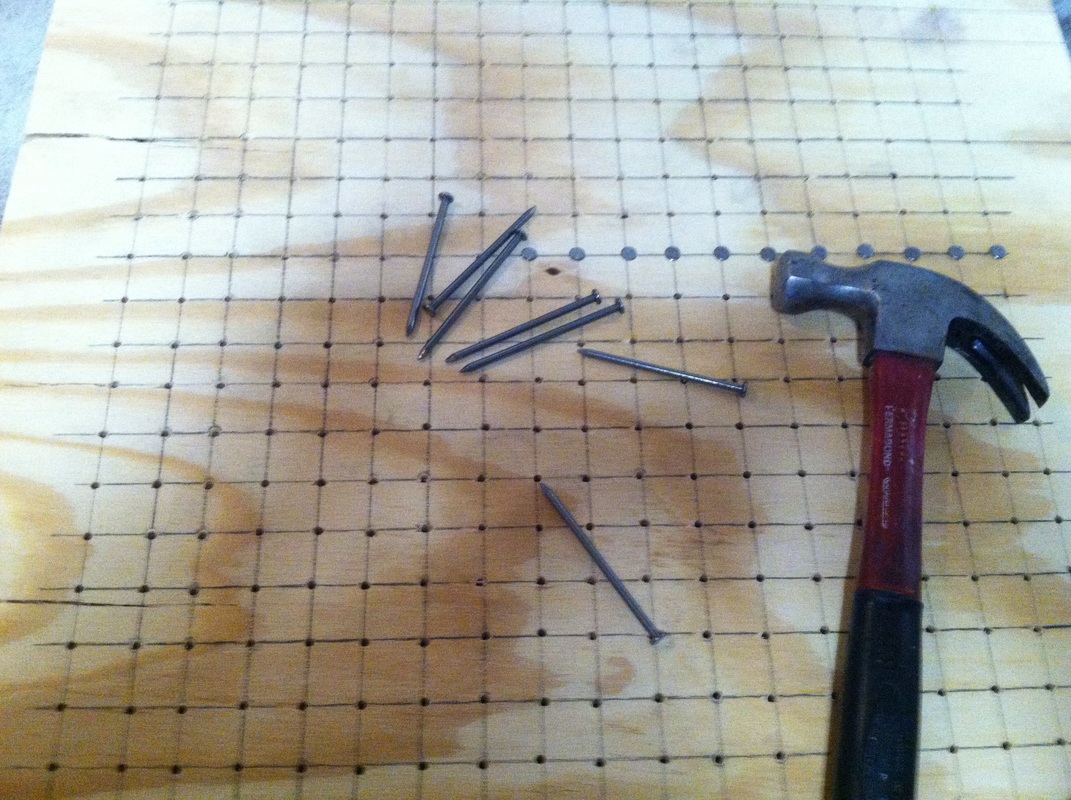  5) And then this: Bed of Nails from John Fladd on Vimeo. This went SO WELL!!
There is a post-script: There is a second, even cooler part of this activity - balancing a cinderblock on my chest while lying on the bed of nails and having an assistant break it with a hammer. I was really excited about doing this, but my Principal was really, really uncomfortable with the idea. I pushed very hard to be allowed to do it in front of my classes, which is my job. He was cautious and responsible and looked at the big picture, which is his job. Ultimately, I wasn't allowed to do the breaking-the-cinderblock-thing with my class, so I did it after school with a couple of colleagues. It was even better than I had imagined! SO. VERY. COOL! I feel really happy and gratified by the back-and-forth that my Principal and I had over this; we both did our jobs passionately and well, and yes, I do understand that from a liability and a setting-a-good-example, and from a common-sense point of view, this whole exercise is not terribly defendable, so I don't expect to ever be allowed to do it again, but Educational Awesomeness doesn't happen every day and I'm really glad I was there this time when it did. 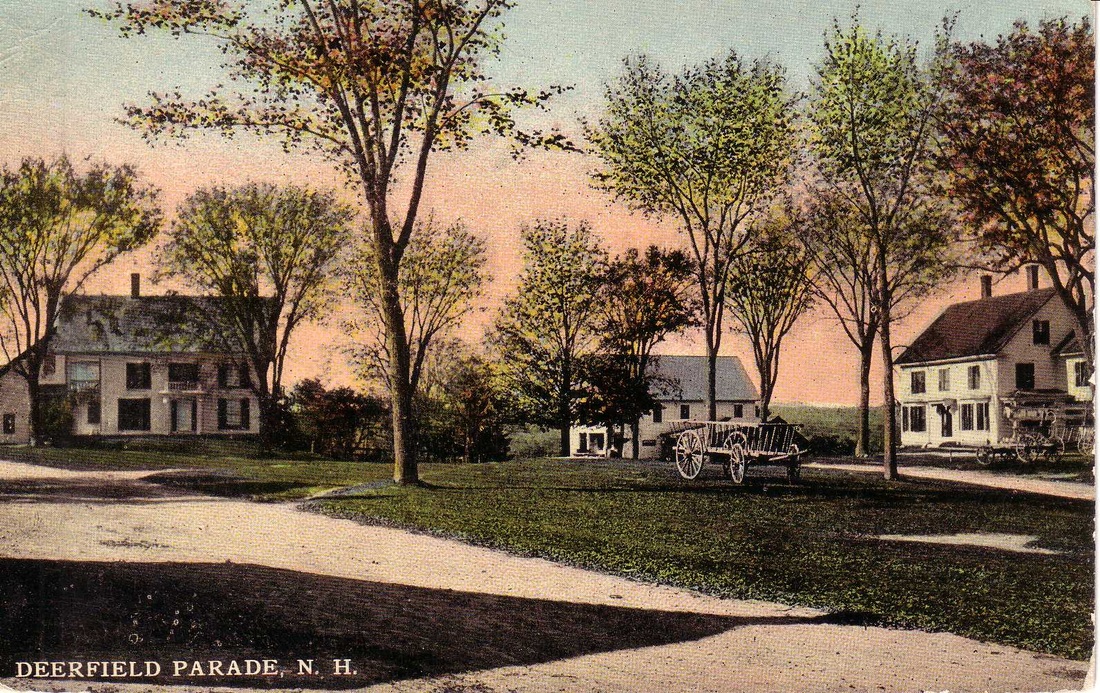 I'm a big believer in scouring eBay for things to make my life more interesting. This has led to many interesting and eye-rolling conversations with my wife and several interesting projects in my classroom. For several years now, I've had eBay automatically notify me when any item having to do with the town of Deerfield, NH (where I teach) comes up for auction. As a result, I've built up a pretty substantial collection of antique postcards, letters, photographs and other primary source documents having to do with this town. (See above) 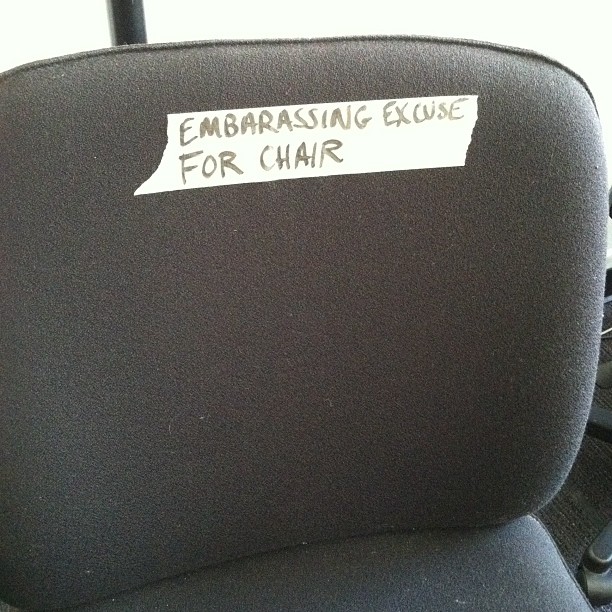 For the last five or six years, my wife and I kept a broken-down office chair in the corner of our dining room. It mostly held piles of mail and other, not-quite-ready-to-throw-out debris, until the holidays, when it was pressed into service for extra seating. This was somewhat problematic, because it doesn't have any working springs in the back, so an unsuspecting diner might accidentally fly backward onto the floor in a puddle of coleslaw. I had particular relatives I always tried to seat in it. Last spring, we finally decided to get rid of it, so I brought it to school, figuring that some student with a penchant for dangerous living might get a kick out of it. That turns out to have been a massive understatement. For the past nine or ten months, each class period has started with an almost ritual squabble over who gets dibs on the "good" chair. Because I'm not very bright, it took me several months to figure out how to use this to my advantage. A couple of years ago, I had the idea of awarding deserving students with a treat - a Cupcake of Tenacity™ - that I could use to recognize consistent effort. Unfortunately, I could never remember to award the cupcakes with any kind of consistency and I eventually just let the whole idea settle into my dustbin of good intentions. Slowly though, ever so slowly, another idea slowly started to grow in the back of my mind. (It's tempting to compare it to a tiny seed sprouting and pushing its way to the surface, but in my case, a more apt metaphor is a layer of mold growing on forgotten left-overs in the back of a sub-par refrigerator.) One morning, as I watched a couple of students face off over my broken-down office chair, I heard myself say, "What you you guys do if you ever had a GOOD chair to fight over?" Click.  Over Christmas Vacation, I spent a couple of days tracking down leads on Craig's List for chairs that might have even more status than the EEFC (see above). My original thought was something like a vinyl easy chair - the sort of chair you might find in a library. (I remembered buying one of these with a young friend many years ago at a thrift store for about ten dollars.) As it turns out, there are a LOT of people eager to sell used chairs, but surprisingly few (okay, I guess not THAT surprising...) who want to unload good-condition library chairs for virtually nothing. 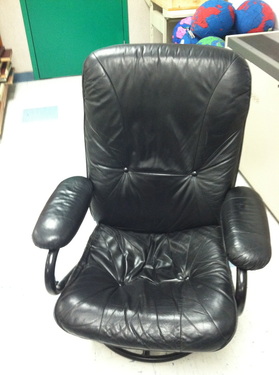 In the end, I found this leather office chair for twenty dollars. It's a little low to the ground, but it's extremely comfortable and even reclines slightly. Each Friday, I've announced the student in each class who gets to sit in it for the next week. Chair Privileges do not necessarily go to the student with the best grades or even the best behavior. They go to students who have put in a solid effort and demonstrated tenacity in their desire to learn. To say that the Status Chair has been well-received would be a massive understatement. The looks on the faces of the students who have been publicly awarded Chair Privileges range from furious blushing to genuine shock. By the end of his or her Chair Week, each student has made a big show of leaning back with his or her hands laced behind their head and a "It's good to be King" expression on his or her face. 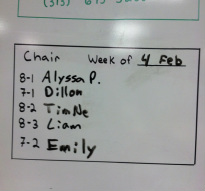
Will this lead to more tenacity and a better work-ethic in my students? Time will tell. I do know this, though - my classroom has gotten a LOT more popular for meetings after school and one of the other teachers always gets to the Status Chair before I do. For the second year in a row, I had my 8th graders research 19th Century primary sources and shop for historical Americans from the 1897 Sears-Roebuck Catalog.
As usual, the most successful part of this project was my two-day lead-up to it, where I delved into topics like drug use and Victorian underwear. The project itself was a mixed success. The students were exposed to primary sources and definitely enjoyed the project, but clearly, some students put more effort into it than others. Some students, for instance, were confused about which person they were actually shopping for, which could have been clarified by looking at their photographs. Other students however, put a lot of thought into their gifts and used the information they had about their people to buy surprising and delightful gifts that their people would have loved. Overall, I'm not unhappy about how this project turned out this year. I'm a big fan of Common Craft videos. This is the third year I've done these videos as a mid-unit project with my 7th graders during their unit in Roman History and the project has evolved significantly over that time: The first year I did the project, I was just happy to get through the project; there were a lot of elements to it and just juggling everything was something of a triumph. I discovered though, that given too much freedom in picking their topics, all 7th graders will turn their videos to the topic of stabbing someone. I made a note to myself to narrow the potential topics to stab-resistant subjects. The following year (last December), I realized that my 7th graders need a lot more scaffolding than my 8th graders. Students' instructions need to be very explicit; they tend to do exactly what they are told - no more, no less. I was also frustrated by the old problem of group-work. Less motivated students would leave the diligent students to do most of the work, then share the same grade. This year, I made it a point to write very, VERY detailed instructions. I wrote a rubric that graded the research and preparation parts of the project much more heavily than the actual movie, which had the double advantage of keeping students on track and being more fair, in terms of group-vrs.-individual work. [Click below to download my project instructions and rubric.] | AuthorMr. Fladd is a recognized authority in... er... um... something. CategoriesAll |
 RSS Feed